View a video on the recommended settings and how to navigate the authoring system.
View the transcript.
ATS Authoring (Keystone) enables planning authorities to draft, amend and publish ordinances to planning schemes.
To assist you with editing or publishing ordinance changes, we have created the following videos.
For more comprehensive guidance, please refer to the ATS online training modules which cover many tasks in greater depth.
View a video on the recommended settings and how to navigate the authoring system.
View the transcript.
View a video on how to access the in-app guidance for help with using the authoring system.
View the transcript.
View the video on how to create or update a table in the authoring system.
View the transcript.
View a video on how to insert, replace or format an image in content using the authoring system.
View the transcript.
View a video on how to format a bulleted list in content using the authoring system.
View the transcript.
View a video on how to insert and format content that has been copied from a Word document.
View the transcript.
View a video on how to change the orientation layout of content being edited in the authoring system.
View the transcript.
View a video on how to apply the styling guide from Ministerial Direction-The Form and Content of Planning Schemes when editing content in the authoring system.
View the transcript.
View a video on how to insert a page break.
View a video on how to move and delete a paragraph.
View a video on how to review content and add comments
The Amendment Tracking System, in particular Amendment Authoring (Keystone) is used to author proposed changes to selected ordinance (content).
During the process of authoring content, every time you edit and save changes, a new version of the content is saved. You can view past saved versions, and compare selected versions.
The following guides show how you can access saved versions, show differences, view tracked changes on screen and choose to merge changes into content. The guide assumes that you have basic knowledge of navigating Amendment Authoring.
Users can choose to view differences between saved versions on screen so long as they are not editing the content. The differences will show in colours as follows;
In the following steps, content is accessed from the ‘EDIT’ tab, however you can access specific content using the ‘REVIEW’ tab if preferred.
1. With the amendment document open, select the content where you would like to see the changes.
2. Select ‘Versions’ from within the ACTIONS menu to expand the listing to see all the saved versions of the content selected.
3. Select the version that you want to compare from. In the below example the user has selected to compare from the latest saved version 2.9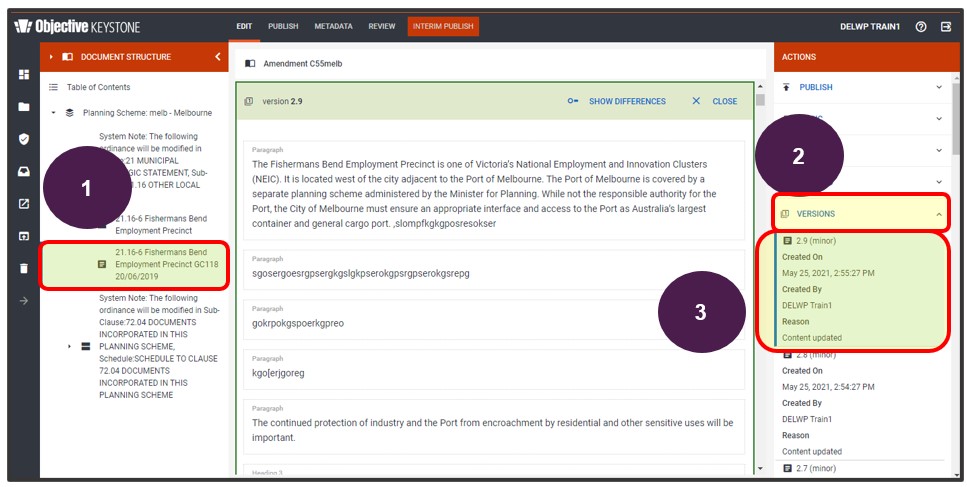
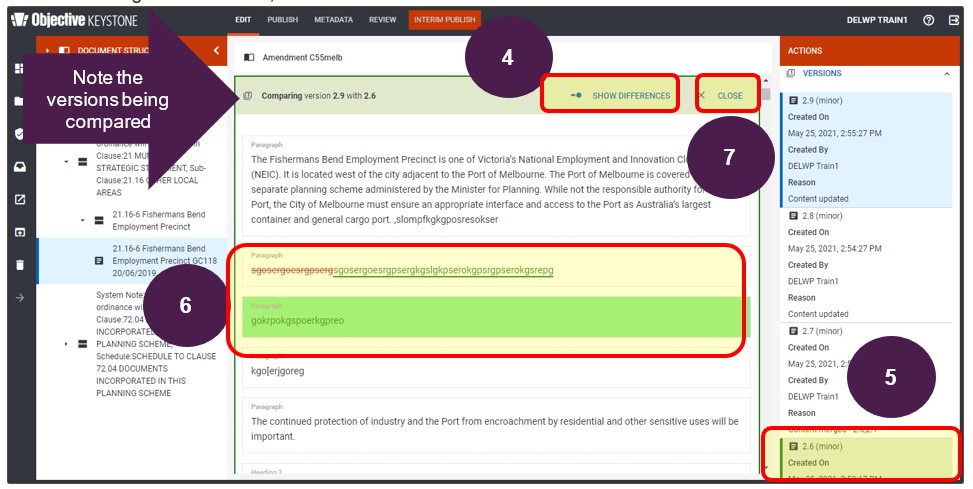
4. Select SHOW DIFFERENCES.
5. Scroll through the available versions and select the version to compare to. In the below example, version 2.6 has been selected.
The screen showing the differences may take some time to load.
6. Scroll through the content to see differences on screen.
7. To finish viewing the differences, select CLOSE.
You can use track change functionality in addition to merge mode whilst editing content. To access this feature, the content must be opened in editing mode. You will need to determine which versions you want to compare to and then step through the noted changes to either accept or reject the change.
This functionality can be extremely useful after a ‘Refresh Amendment Workflow’ has been applied to the amendment document and where the content has been refreshed with a copy of the most recent ordinance from the planning scheme, overwriting previous changes made to content.
If using this function after a ‘Refresh Amendment Workflow’ has been applied to your work, you should not be rejecting changes to the ordinance that has come about by a recent gazettal.
8. With the amendment document open, select the content where you would like to see the changes.
9. Select EDIT to open the content to edit.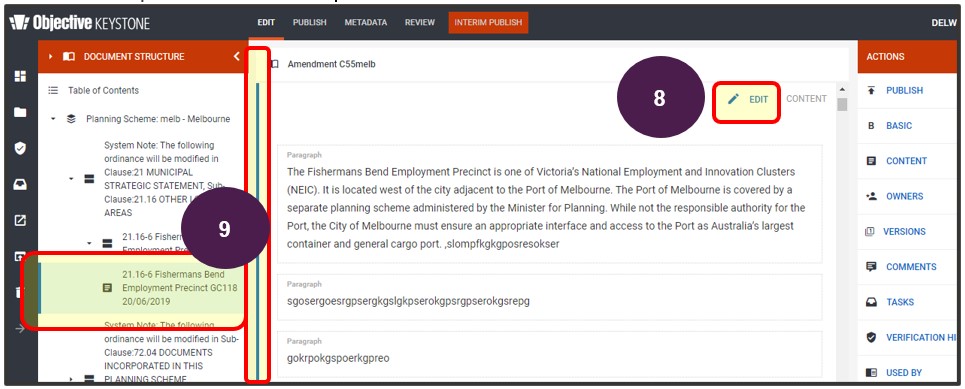
10. Select TRACK CHANGES to load the track change view. Note that this may take some time to load, especially where there are large sections of content and tables.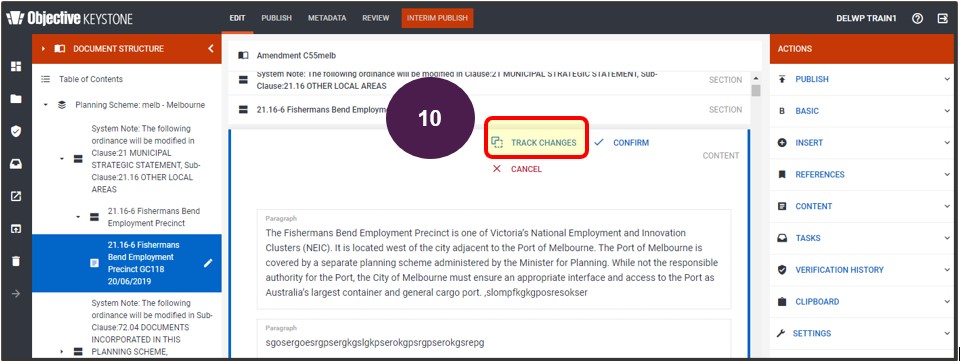
11. Select the version to compare to. In this example, version 2.6 is selected. The differences on screen are showing the changes that have been made since version 2.6.
12. Select MERGE MODE to see the functionality to step through the changes to either accept or reject them. 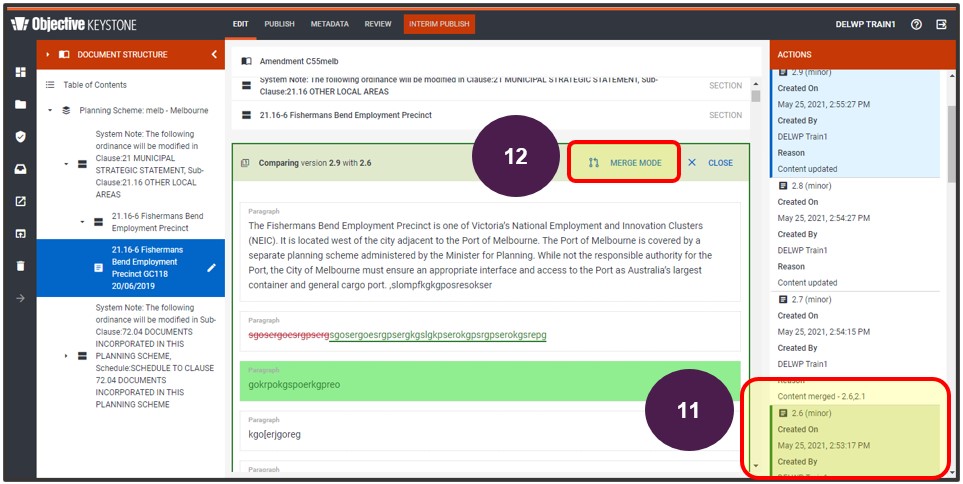
13. Using the arrows located under the MERGE function (see ACTIONS menu) you can step through the changes.
14. The blue marker shows the changed item.
15. The ‘Change Detail’ field advises what change occurred where the blue marker is located.
16. Select the option of ACCEPT to agree with the change noted or to REJECT if the change is not wanted.
17. You can step through each change noted or choose to ACCEPT ALL OUTSTANDING or REJECT ALL OUTSTANDING.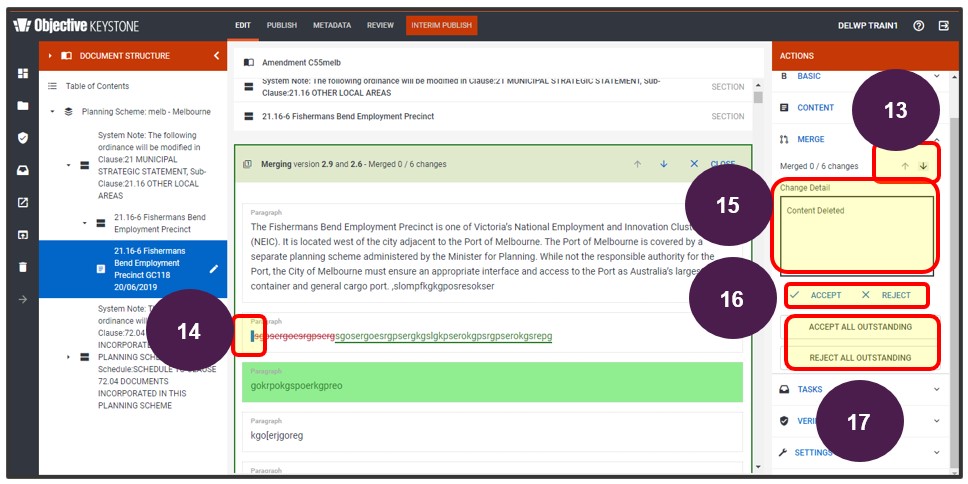
18. In the below example, the first noted change was accepted and the second rejected which removed all text from the paragraph.
19.You can then choose to ACCEPT ALL OUTSTANDING, REJECT ALL OUTSTANDING or UNDO ALL MERGED CHANGES.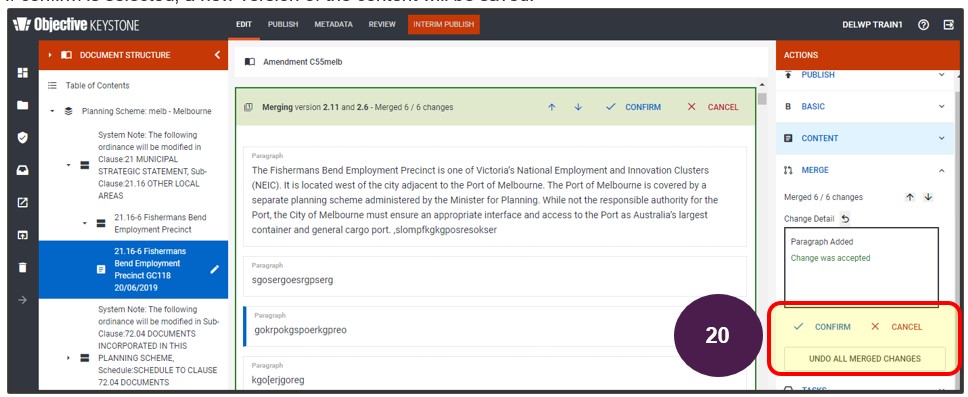
20. Once the outstanding changes have been either accepted or rejected, select to CONFIRM, CANCEL or UNDO ALL MERGED CHANGES to return to the editing screen. If confirm is selected, a new version of the content will be saved.
21. Continue editing the content as required.
 View page on saved versions, track changes and merge
Amendment document – file in ATS Authoring that is created after the instruction list form is submitted from ATS Tracking. It contains the ordinance that is being proposed to be changed. The document includes system notes advising what action is occurring for each ordinance, for example, Modify, Delete, Add. You will edit this document with proposed changes to the selected ordinance.
Content – text, images, table or other data that forms the ordinance being worked on.
Refresh Amendment Workflow – process that is run after seeing the message ‘Master Content has changed since last synchronize’, where a recent gazettal has made a change to the ordinance. After running the workflow, the content will be refreshed with a copy of the ordinance from the current master and will overwrite any prior changes made to content. Changes will need to be reinserted into the refreshed content.
Version – a saved copy of content at a particular point in time.
View a video on how to publish the amendment document and view the results whilst in the editor screen.
Reminder: The Interim Publish module will need to be used to generate documents for the draft amendment ordinance with the parent provisions. Choose the option to produce PDF comparisons against the master copy to view tracked changes. See the Interim Publish section for further details.
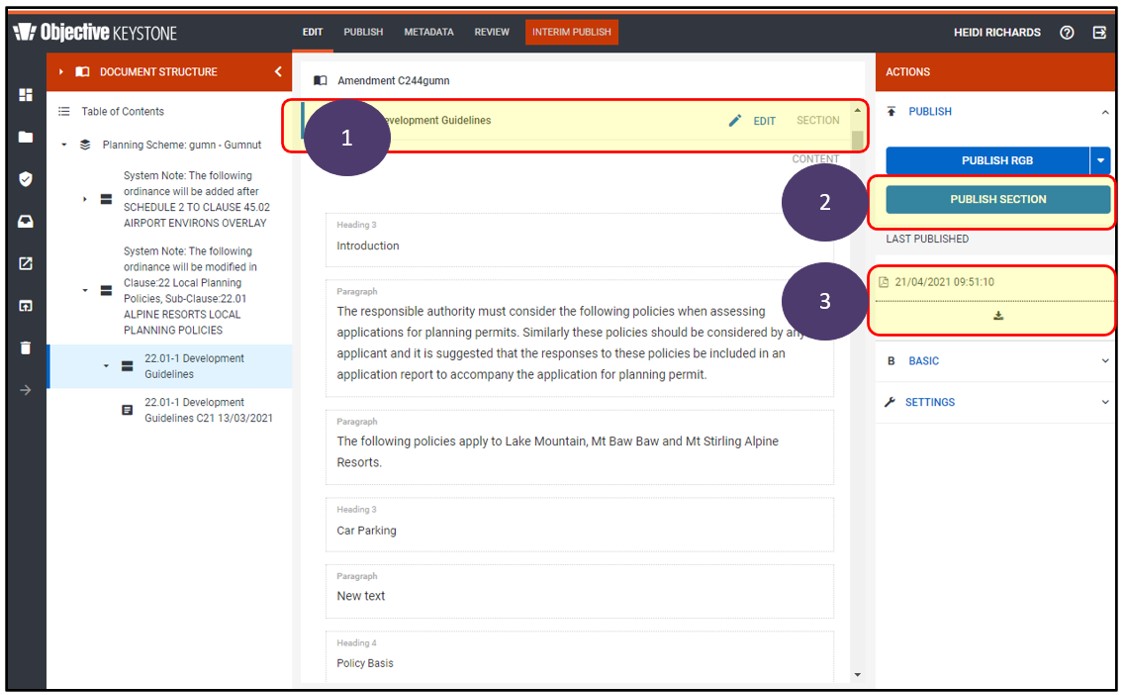
The following guide demonstrates how a user of Amendment Authoring can generate a PDF of one section of an amendment document to view the format once printed, rather than having to view all ordinance that has been included in the entire amendment document.
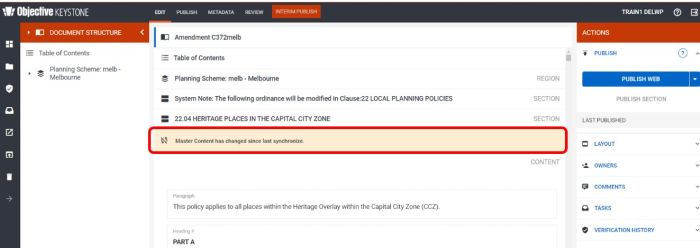
When you are in an amendment document authoring ordinance, if you see the message ‘Master Content has changed since last synchronize’ it means there have been changes to the master document (i.e ordinance) and you are not working from the most up to date version from the planning scheme.
If you see this message;
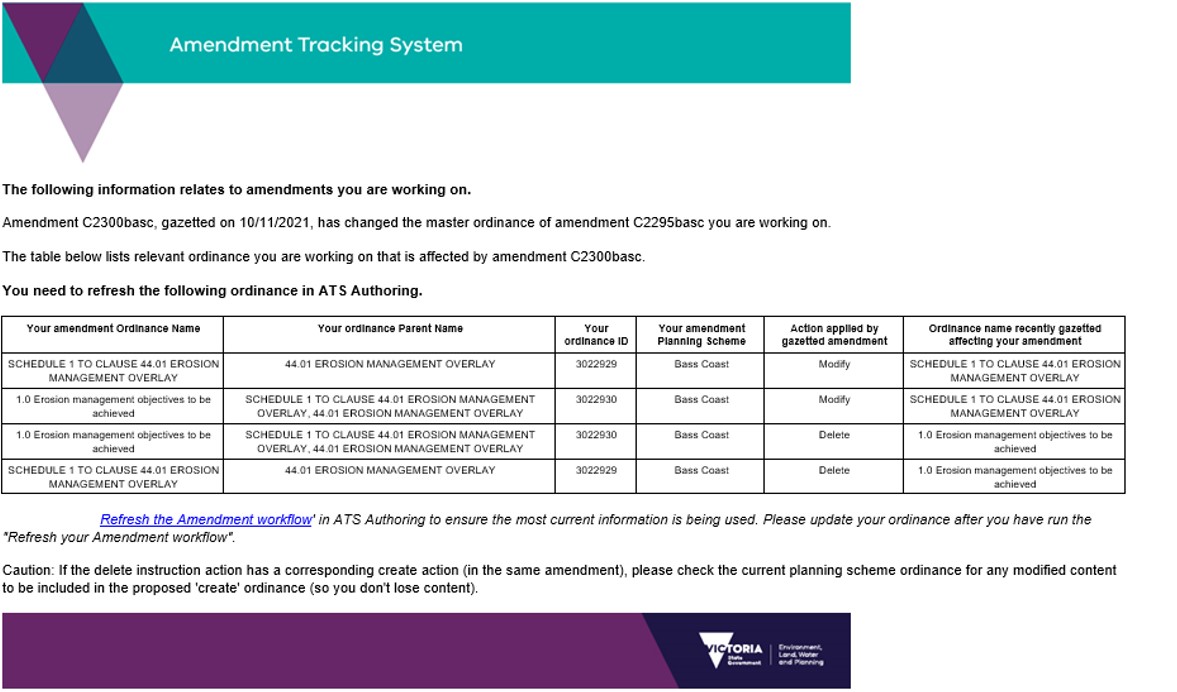
If you are the contact for an amendment, you may have also received an email advising you that your amendment has been affected by the recent gazettal of another amendment. It is important to take note of this email to see what changes have been made to the planning scheme that has affected the amendment you are working on.
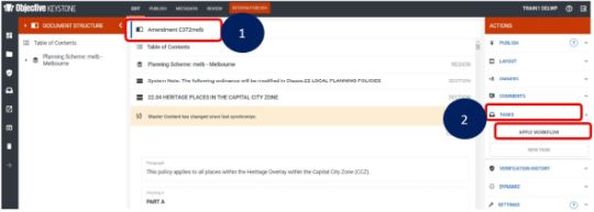
1. With the amendment document open, select the Amendment Heading. Selecting this will apply the workflow to the entire amendment document but will only affect those sections where the message appears.
2. From the Actions menu, select Tasks and Apply Workflow.
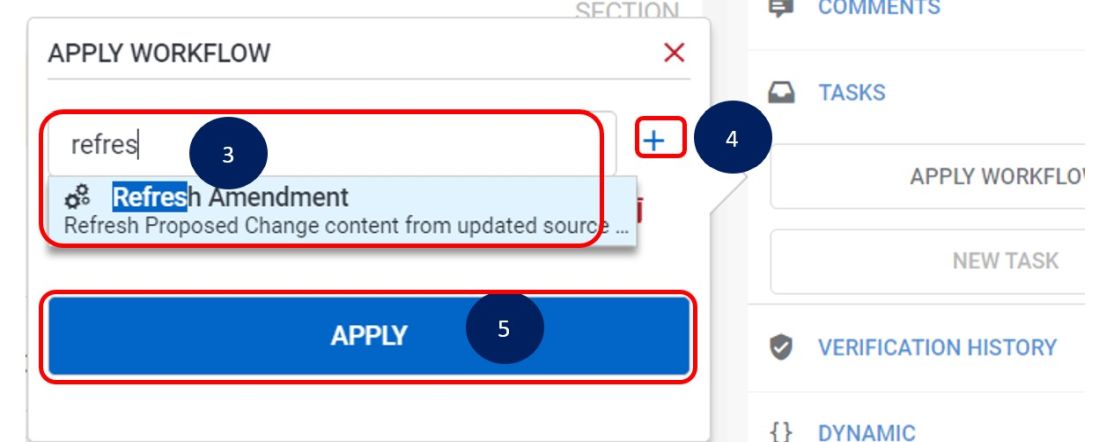
3. Type in ‘Refresh’ into the search box and select ‘Refresh Amendment’.
4. Select the plus (+) sign to add the workflow into the listing.
5. Select Apply.
6. A message will appear very briefly on screen advising that the Workflow has been applied.

7. Refresh the web browser tab to see the updated content. (Windows users can select F5 of their keyboard).
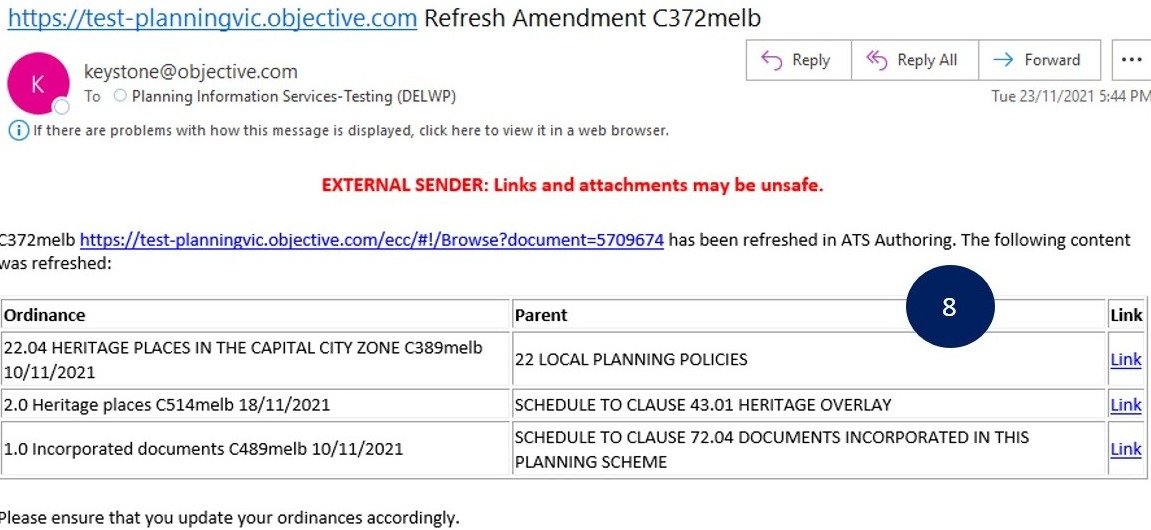
8. You will receive an email to let you know the refresh has been applied to the amendment document. The email will include a listing of the ordinance that has had the content refreshed with a new baseline version.
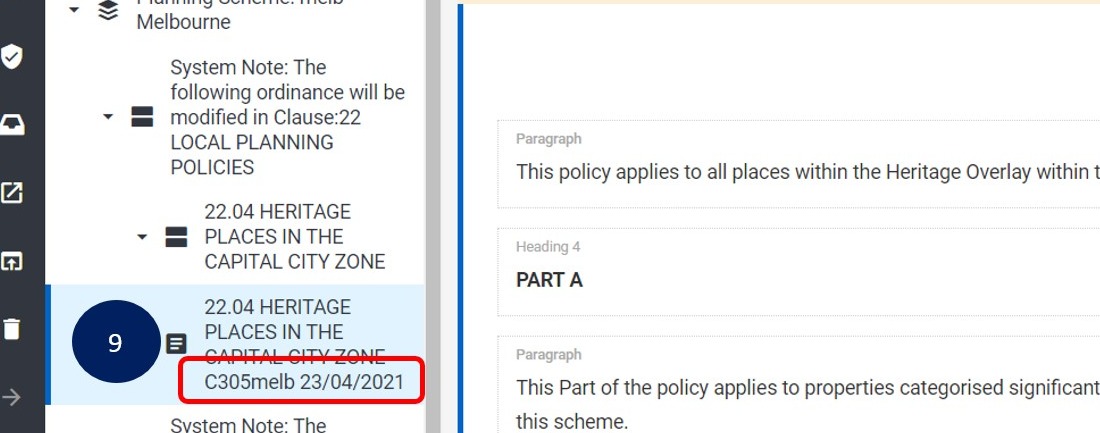
9. You will also see details of the amendment number and gazettal date of the last amendment that made a change to the ordinance.
10. If your amendment includes ordinance that has been deleted by another gazetted amendment, an alert will appear on screen advising you to change your amendment to remove the instruction. (See create or edit an instruction list in ATS Tracking, Remove an item from amendment instruction list). 
11. If you were working on changes before you performed the refresh, those changes will not be visible in the new version however they will have been saved in a previous version. The changes will need to be reinserted into the refreshed content. See ‘View saved versions, track changes and merge’ for details on how changes can be reinserted into refreshed content.
The refresh workflow will create another version of content which will be the latest copy from the master ordinance. Your changes will still be available in another version and using track changes and merge mode can assist you to quickly re-insert your changes into the refreshed content.
An Amendment Gazettal Health Check is a workflow that can be run to advise you if your amendment contains any structural errors that will prevent it from gazetting due to conflicts with current ordinance in the Planning Scheme or if any parts of content requires a refresh from the master copy.
This Amendment Health Check WILL NOT advise if planning content in the provision is correct. Consultation is still required with the Department or Planning Authority.
1. When in the amendment document in ATS Authoring (Keystone), select the amendment name.
2. Select TASKS from under the Actions menu.
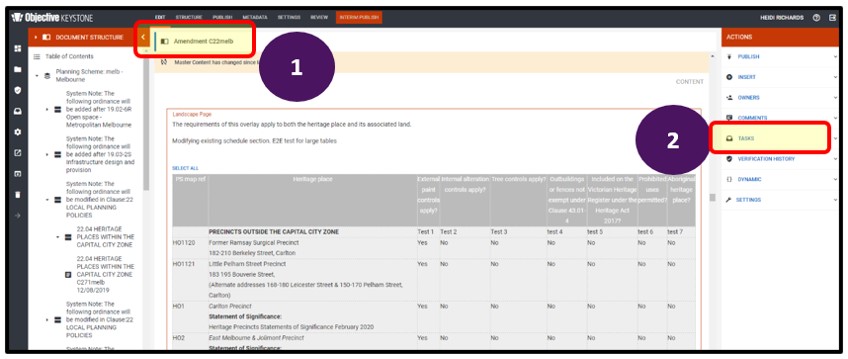
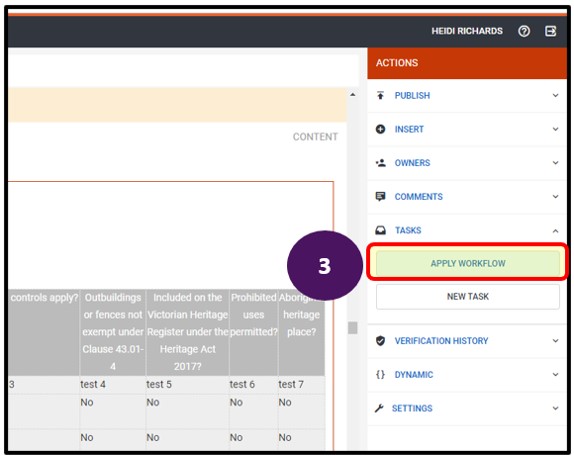
3. Select APPLY WORKFLOW
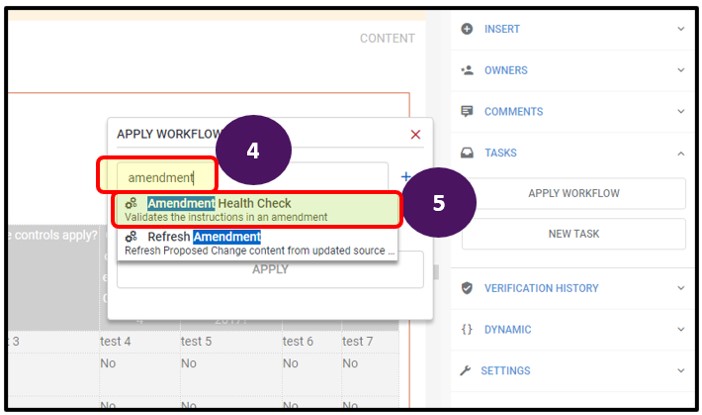
4. Type in ‘amendment’ in the Search workflow field
5. Select ‘Amendment Health Check’ when it appears in the listing
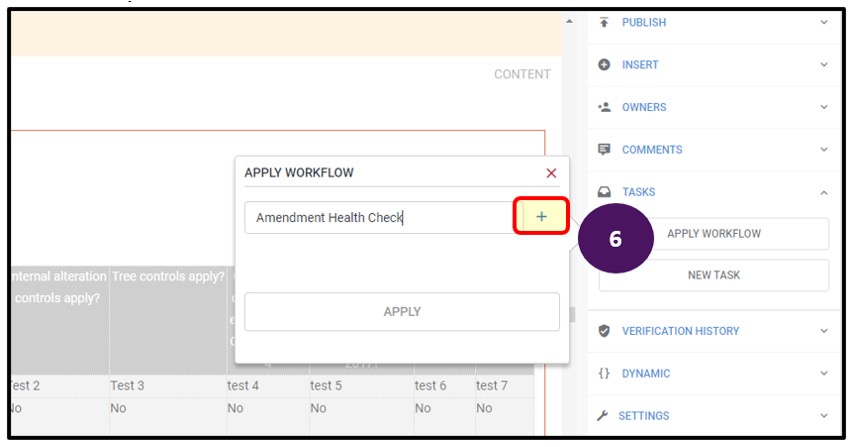
6. Select the ‘+’ symbol to add the workflow
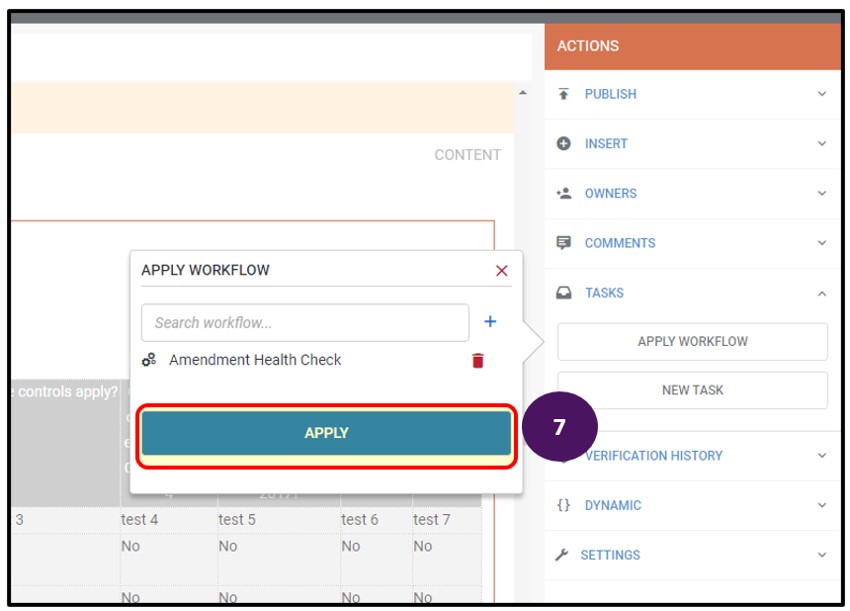
7. Select APPLY to run the workflow on the amendment document.
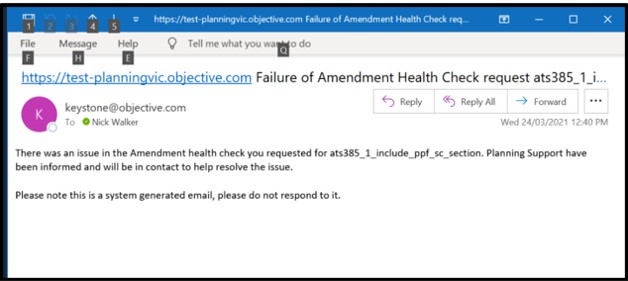
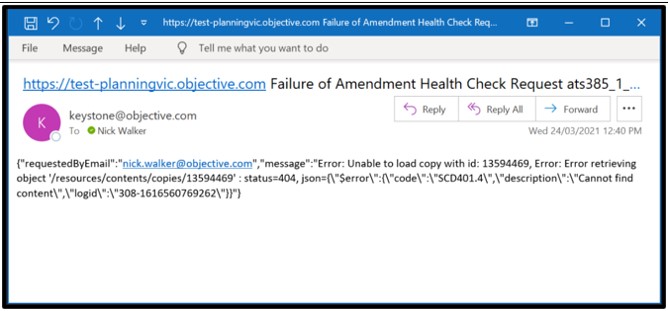
8. The user running the workflow will receive an email advising of the success or fail of the workflow with additional information regarding the results of the workflow.
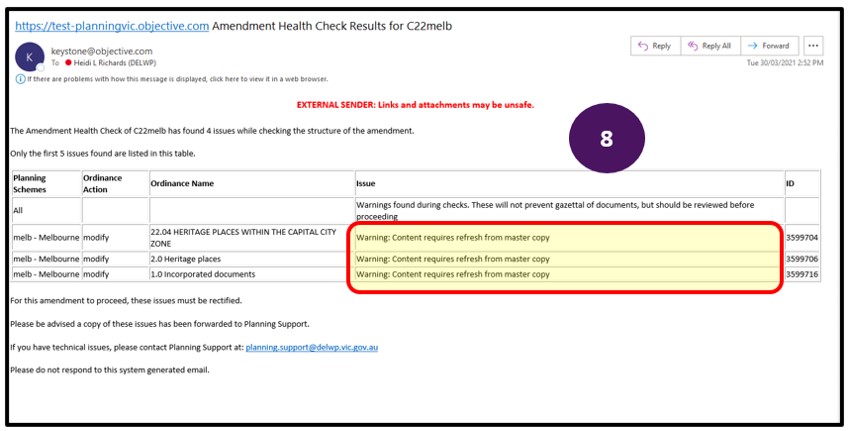
In the below example, the email is alerting the user that the ‘content requires a refresh from master copy’, meaning that the master content has changed since the amendment was first created therefore the user will need to run the Refresh Workflow process (see How to Refresh Amendment Workflow)
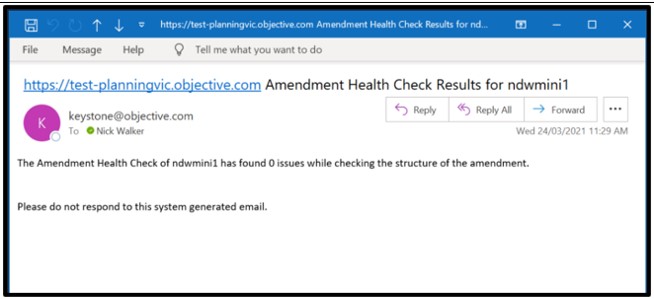
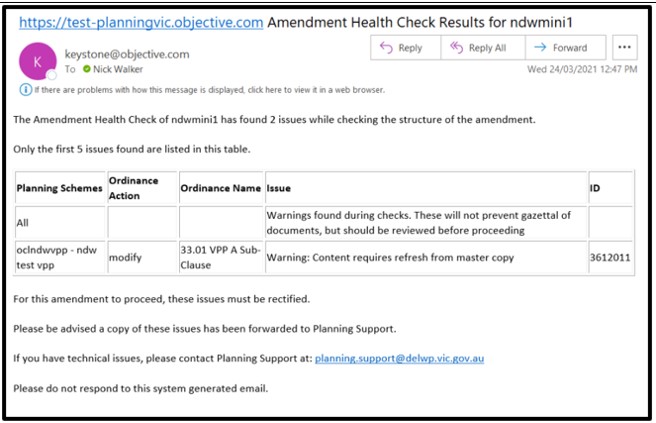
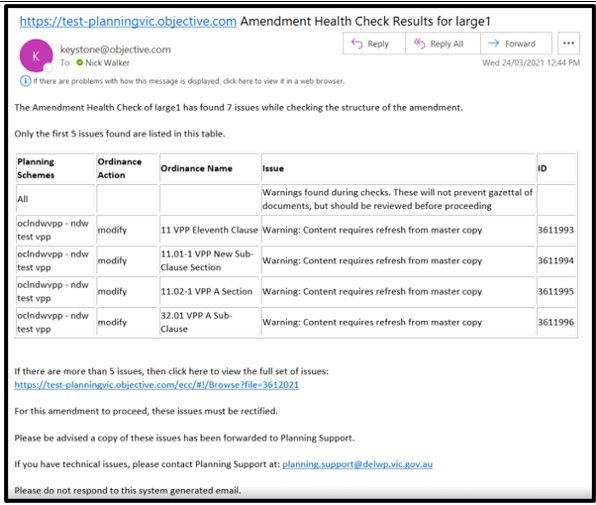
Further examples of other emails received from running the Amendment Health Check Workflow:
Using this customised capability will produce a PDF of the draft amendment ordinance, combined with it's parent provisions. For example, if an amendment is modifying schedule section 2.0 Heritage Places, the PDF will display the entire schedule to clause 43.01, displayed in accordance with Ministerial Direction on the Form and Content of Planning Schemes.
When generating documents using the Interim Publish module, users can:
The following provides some guidance on how to use the Interim Publish module, compare changes to other saved versions and use the available filter options. It assumes that the user has knowledge of navigating ATS Authoring.
If the user does not require a document showing tracked changes, they do not need to select the 'Produce PDF Comparisons' option.
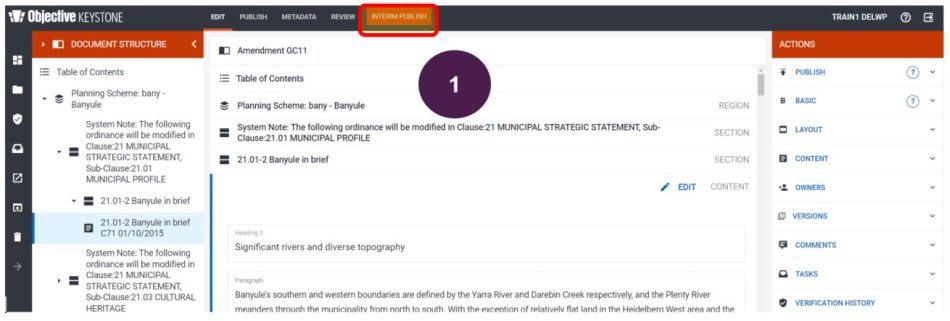
1. Using ATS Authoring, whilst in the amendment document, select the Interim Publish button.
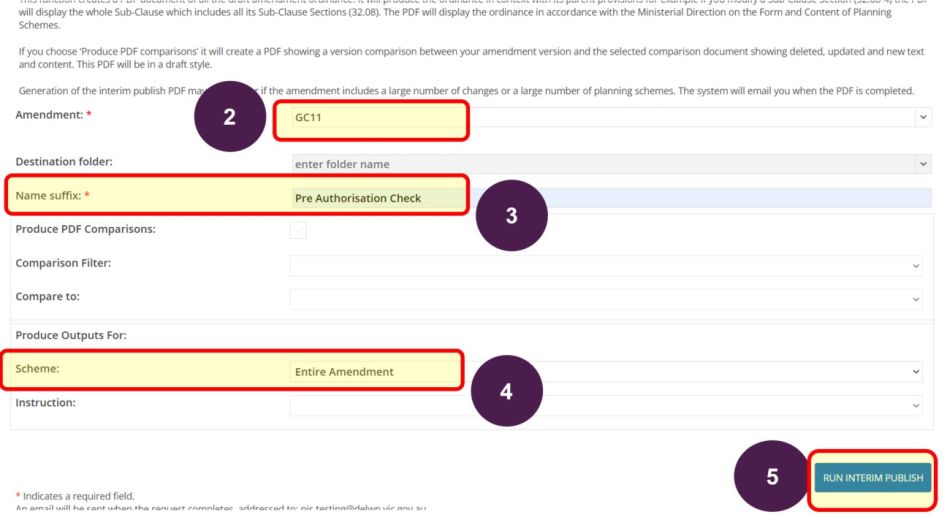
2. The user will be taken to the interim publish screen. The amendment number will default to the amendment that is being worked on. If the amendment number is not appearing, enter the number and select it when listed.
3. Enter a name for the folder. The name should make sense and does not need to include the amendment number, date or status.
4. At the ‘Produce Outputs For’ section, leave the default as ‘Entire Amendment’.
5. Select the ‘RUN INTERIM PUBLISH’ button.
6. Select OK to acknowledge the message that the request has been submitted.
7. A reference number will appear showing that the request has been submitted. Do not click on ‘RUN INTERIM PUBLISH’ again, unless the selection criteria is changed to produce a different set of documents.
8. If the interim publish is successful, the user who has generated the interim publish will receive an email once the documents are ready. Click on the URL link in the email to be directed to the interim publish folder.
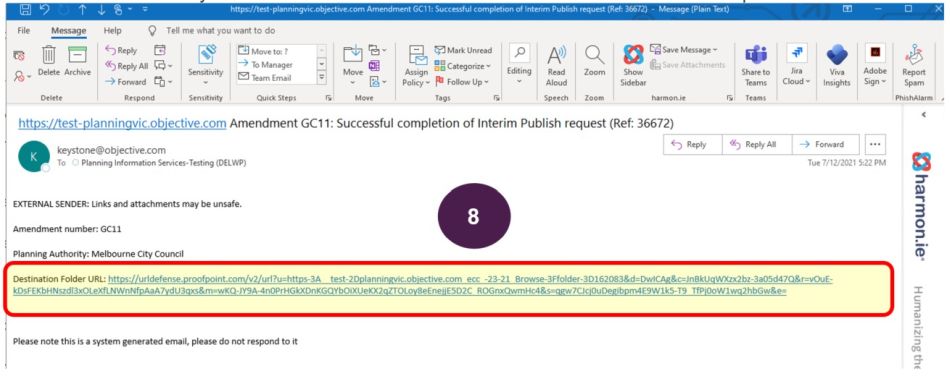
9. If an email is received advising that the interim publish was unsuccessful, contact the team at planning.support@transport.vic.gov.au for assistance.
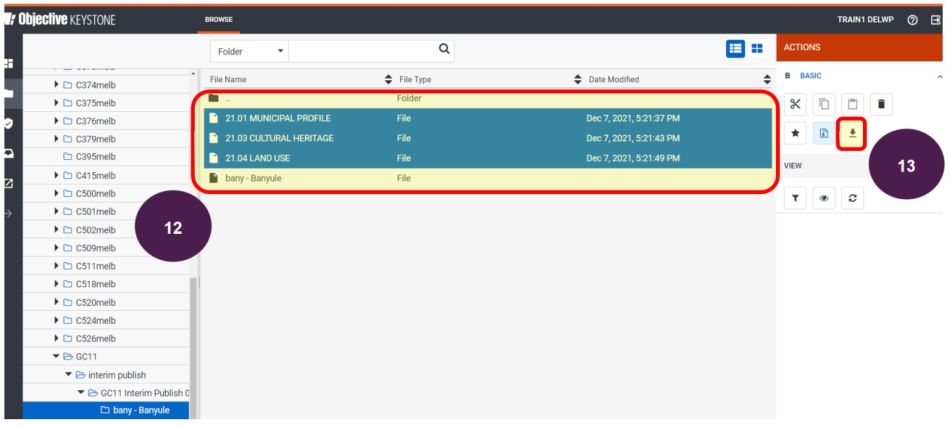
10. Once in the folder, select the sub-folder for the planning scheme. A GC or VC amendment will contain more than one sub-folder.

11. The number of files listed in the sub-folder will be dependent on the ordinance selected for changing or adding into the planning scheme. In this example, the amendment is modifying ordinance in three different
planning schemes, and for the Banyule scheme the sub clause sections 21.01-2, 21.03-1 and 21.04-1 have been selected to be modified, so all provisions under 21.01, 21.03 and 21.04 are supplied in the documents. The user can download all files at once to view or select each file individually. Also, where
a schedule section is modified, the ordinance with the proposed changes will be presented as part of the entire schedule.
12. Select the file or files (While holding Ctrl , click each of the other files) to select.
13. Select the download icon.
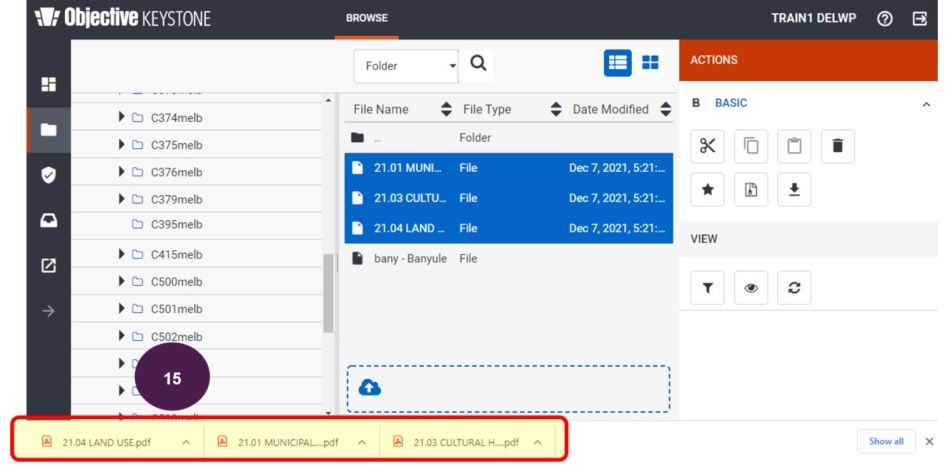
14. Depending on the web browser used and configuration, the files may appear on screen or in your Downloads folder via File Explorer.
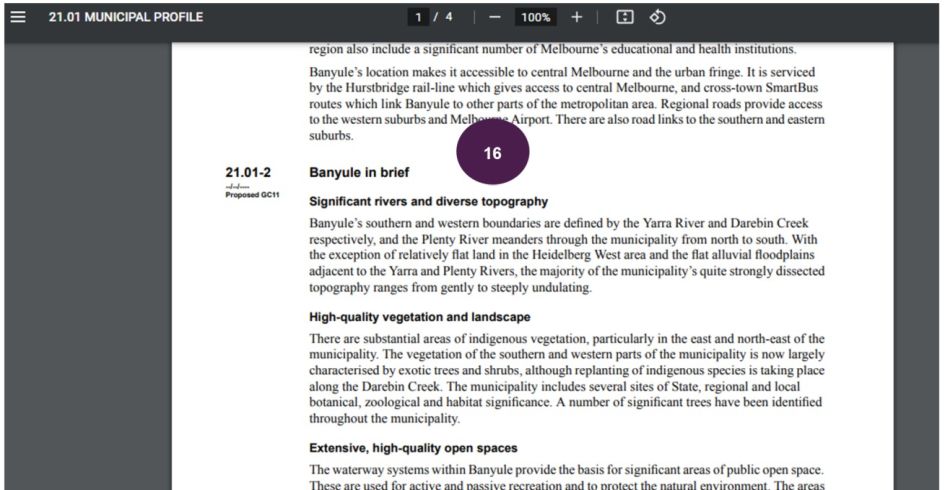
15. Click on the file to open the PDF to view the
ordinance which will open in another browser tab.
16. Scroll through the document and check as required.
When a user wants to see their entire amendment's proposed changes to ordinance against the copy of the ordinance as it appears in the planning scheme, they will want to compare to the ‘Current Master Content’.
1. Using ATS Authoring, whilst in the amendment document, select the Interim Publish button.
2. The user will be taken to the interim publish screen. The amendment number will default to the amendment that is being worked on. If the amendment number is not appearing, enter the number and select it when listed.
3. Enter a name for the folder. The name should make sense and does not need to include the amendment number, date or status as this is automatically recorded.
4 .Check the box at to ‘Produce PDF Comparisons’.
5. At the ‘Comparison Filter’ field, select ‘Baselines’. The ‘Compare to’ field will default to ‘Current Master Content’.
6. At the ‘Produce Outputs For’ section, leave the default for ‘Entire Amendment’.
7. Select the ‘RUN INTERIM PUBLISH’ button. 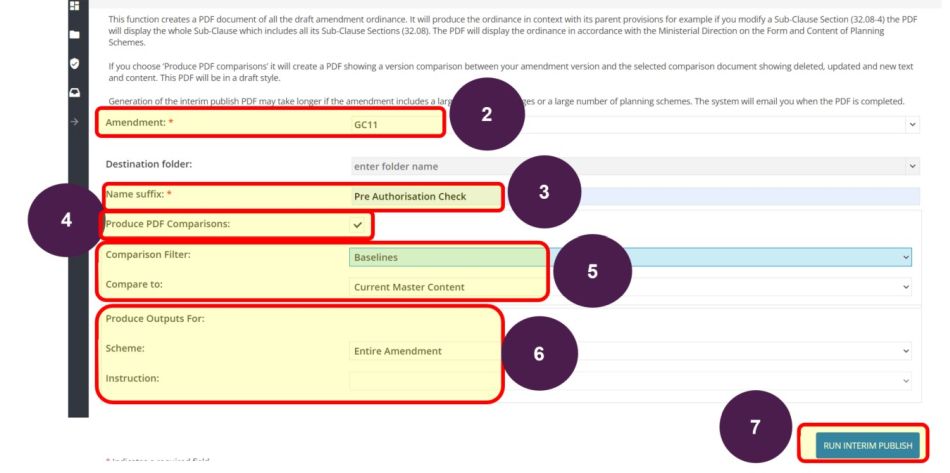
8. Select OK to acknowledge the message that the request has been submitted. 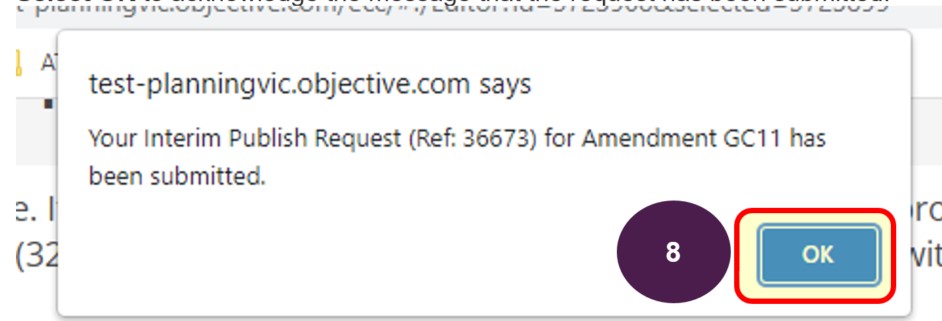
9. A reference number will appear showing that the request has been submitted. Do not click on ‘RUN INTERIM PUBLISH’ again, unless the selection criteria is changed to produce a different set of documents
10. If the interim publish is successful, the user who has generated the interim publish will receive an email once the documents are ready. Click on the URL link in the email to be directed to the interim publish folder.
11. If an email is received advising that the interim publish was unsuccessful, contact the team at planning.support@transport.vic.gov.au for assistance.
12. Once in the folder, select the sub-folder for the planning scheme. A GC or VC amendment will contain more than one sub-folder. 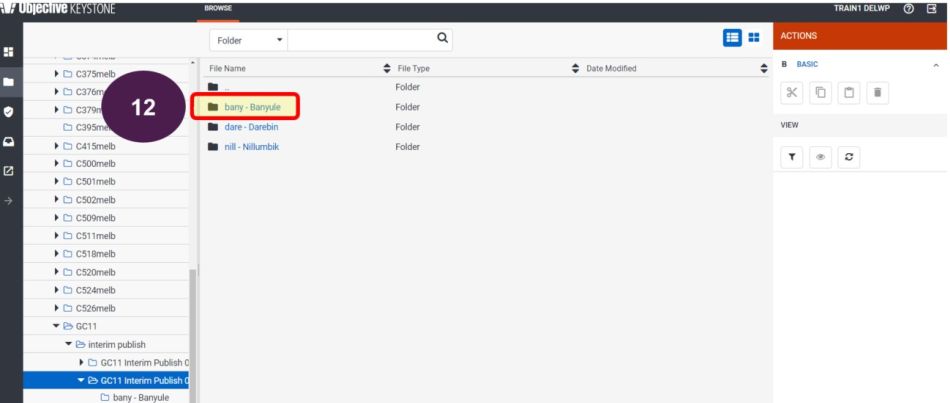
13. The number of files listed in the sub-folder will be dependent on the ordinance selected for changing or adding into the planning scheme. In this example, the amendment is modifying sub-clause sections 21.01-2, 21.03-1 and 21.04-1 so the documents that are generated will include other ordinance that fall under sub-clause 21.01, 21.03 or 21.04. The user can download all files at once to view or select each file individually. Also, where a schedule section is modified, the ordinance with the proposed changes will be presented as part of the entire schedule.
14. As the option was selected to produce a PDF comparison document, there will be a second file created that will include ‘Compare’ in the name.
Note: Such comparison files will not exist for ordinance that is being created as there is nothing to compare to in the master of the planning scheme.
15. Select the file or files (While holding Ctrl, click each of the other files) to select.
16. Select the download icon.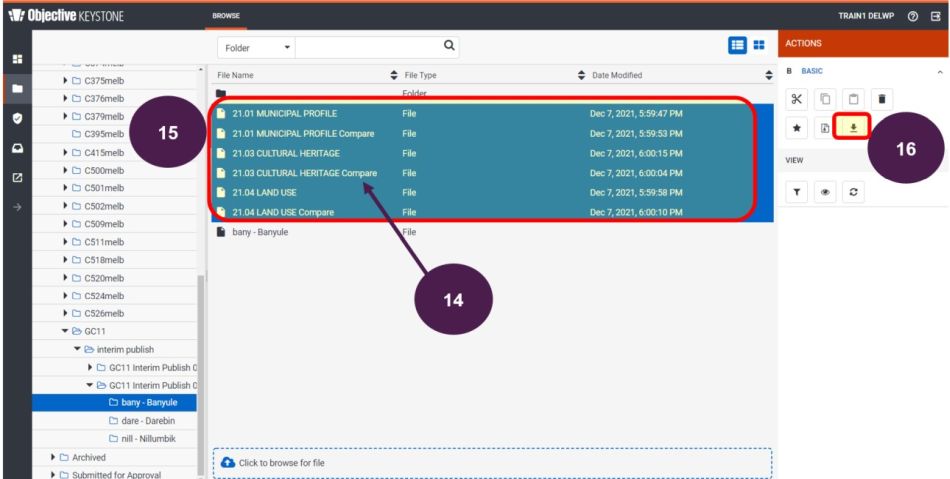
17. Depending on the web browser used and configuration, the files may appear on screen or in your Downloads folder via File Explorer.
18. Click on the file to open the PDF to view the ordinance which will open in another browser tab.
19. Scroll through the document and check the ordinance with proposed changes as required.
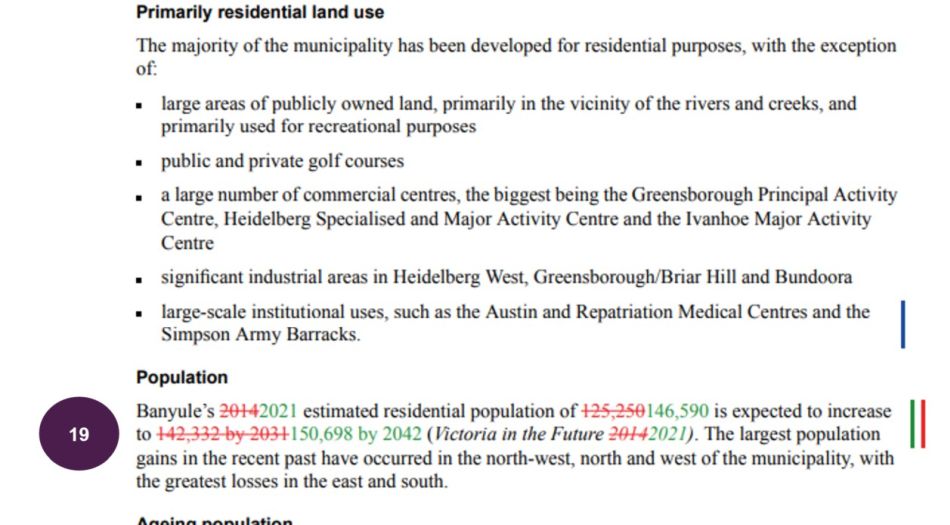
When a user wants to see their proposed changes to ordinance compared with a version produced at another point in time, they can choose to compare to a snapshot that they have generated (‘My Snapshots’) or they can compare to a system generated snapshot. System generated snapshots are created at the time the status of the amendment is changed.
1. Using ATS Authoring, whilst in the amendment document, select the Interim Publish button.

2. The user will be taken to the interim publish screen. The amendment number will default to the amendment that is being worked on. If the amendment number is not appearing, enter the number and select it when listed.
3. Enter a name for the folder. The name should make sense and does not need to include the amendment number, date or status.
4. Check the box at to ‘Product PDF Comparisons’.
5. At the ‘Comparison Filter’ field, select either ‘My Snapshots’ or ‘System Generated’.
6. At the ‘Compare to’ field, select the snapshot that the comparison is to be made to.
7. Select the ‘RUN INTERIM PUBLISH’ button.

8. Select OK to acknowledge the message that the request has been submitted.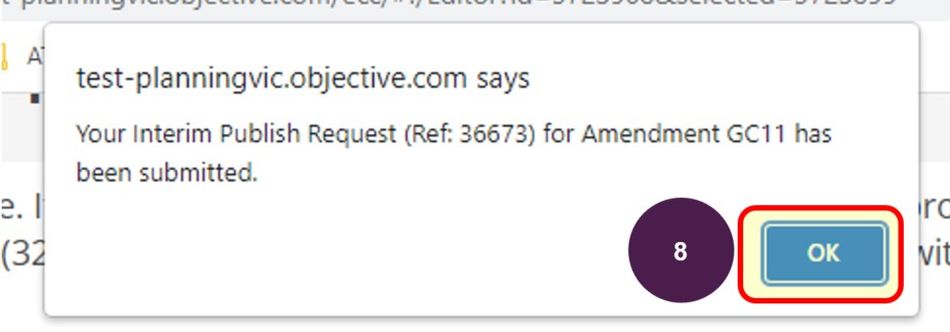
9. A reference number will appear above the amendment field showing that the request has been submitted. Do not click on ‘RUN INTERIM PUBLISH’ again.

10. Follow steps 10 to 19 from the above section to understand how to access the interim publish folder and download the documents.
The above guides show how users can generate a set of documents that covers the entire amendment. However, there may be a time when the user only wants to run the Interim Publish for a small part of the amendment. This guide shows the user the available filter options to;
1. From the Interim Publish screen (see step 1 from above guides if needed) enter a name for the folder. The name should make sense and does not need to include the amendment number, date or status.
2. If a copy of the documents with track changes is needed, then check the box at ‘Product PDF Comparisons’ and select the required filter. A reminder that selecting ‘Baselines’ will provide a copy of the documents with track changes showing proposed changes against the current master copy from the planning scheme.
3. At the section ‘Produce Outputs For’, you have some options;
a. Produce documents for the Entire Amendment – will produce a set of documents that will include all the ordinance that have been selected to be changed for all planning schemes, or
b. Produce documents for just one planning scheme, covering all instructions – will produce a set of documents that will include all the ordinance that have been selected to be changed for the selected planning scheme, or
c. Produce documents for just one planning scheme, covering an individual instruction – will produce a set of documents that will include the ordinance that has been selected to be changed for the selected planning scheme. Note if sibling ordinance is also being changed as part of the amendment, they will also be included in the document.
The instructions listed in the drop down are the same as those that can be seen as the ‘System Note’ when in the amendment document;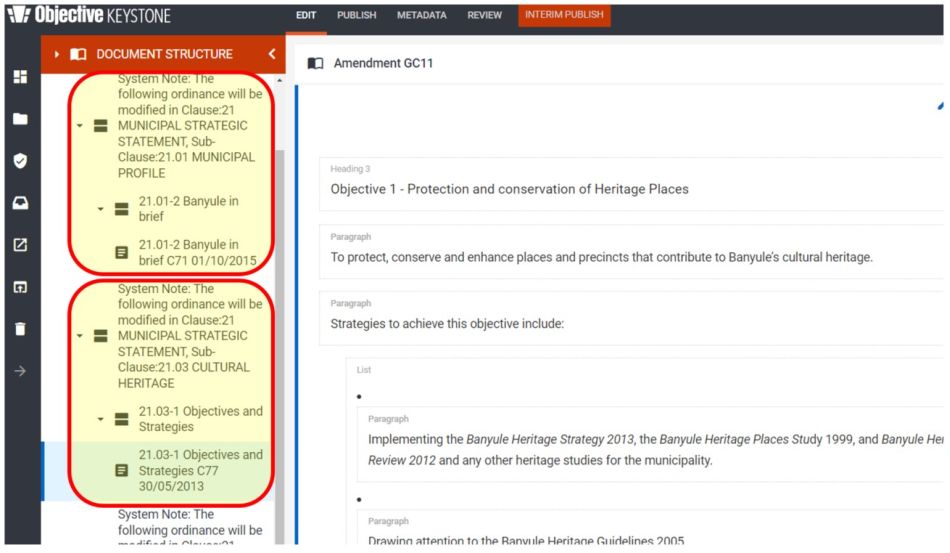
4. Once the appropriate selections have been made, continue to run the Interim Publish and view the documents when available. (see steps 7 to 9 in the above section of the guides if needed).
Using the compare filter and selecting a specific snapshot, will provide varying results as noted in the following table. It may be best to check the status of the amendment and then determine which snapshot should be compared to. (*PA = Planning Authority).
(Department - being assessed.)
| Comparison Filter | Compare to: | Who should use this and what will they see? |
|---|---|---|
| System Generated | Authorisation Under Consideration | DELWP Planner: *Generated after reviewing and making any changes to ordinance, tracked changes will only show the changes proposed to ordinance since the amendment was submitted by the PA to the department for authorisation. *Changes made to ordinance prior to the amendment being submitted for authorisation will not be shown as a tracked change. |
(PA - for them to prepare for exhibition.)
| Comparison Filter | Compare to: | Who should use this and what will they see? |
|---|---|---|
| System Generated | Authorisation Under Consideration | PA Planner:*Changes made to ordinance prior to the amendment being submitted for authorisation will not be shown as a tracked change. *Generated as soon as the amendment is authorised, tracked changes will only show the changes (if any) made by the department since the amendment was submitted for authorisation. *Generated after the PA makes further changes, tracked changes will only show the changes made to ordinance since the PA submitted the amendment for Authorisation, so may include any changes made by the department to ordinance after the PA submitted the amendment for authorisation. |
| System Generated | Authorised | PA Planner: *Generated after the PA makes further changes, tracked changes will only show the changes made to ordinance since the department authorised the amendment. *Changes made to ordinance prior to the amendment being authorised will not be shown as a tracked change. |
(Department - being assessed for exhibition.)
| Comparison Filter | Compare to: | Who should use this and what will they see? |
|---|---|---|
| System Generated | Authorised | DELWP Planner: *Generated as soon as exhibition request submitted by PA, tracked changes will only show the changes made to ordinance since the department authorised the amendment. *Changes made to ordinance prior to the amendment being authorised will not be shown as a tracked change. |
| System Generated | Exhibition request submitted | DELWP Planner: *Generated after the department makes changes to ordinance, tracked changes will only show changes made to ordinance since the amendment was submitted by the PA for exhibition. *Changes made to ordinance prior to the amendment being submitted for exhibition will not be shown as a tracked change. |
(PA - where Exhibition period has finished and Panel Hearing (if it was requested) has completed. PA can now consider adoption of the amendment)
| Comparison Filter | Compare to: | Who should use this and what will they see? |
|---|---|---|
| System Generated | Exhibition request submitted | PA Planner: *tracked changes will only show the changes proposed to ordinance since the amendment was submitted for exhibition by the PA to the department. Changes made to ordinance prior to the amendment being submitted for exhibition will not be shown as a tracked change. |
| System Generated | Under Exhibition | PA Planner: *tracked changes will show all changes made to ordinance since the amendment was exhibited. For example, may include changes made to ordinance as a result of the PA including recommendation from Panels. *Changes made to ordinance prior to the amendment being under exhibition will not be shown as a tracked change. |
| System Generated | Adoption Under Consideration | PA Planner: *tracked changes will only show the changes proposed to ordinance since the amendment has been with the PA for adoption and will include any changes that the PA make to ordinance since the change in status to Adoption Under Consideration. *Changes made to ordinance prior to the amendment being considered for adoption will not be shown as a tracked change. |
(Department – PA has submitted the amendment for approval.)
| Comparison Filter | Compare to: | Who should use this and what will they see? |
|---|---|---|
| System Generated | Exhibition request submitted | DELWP Planner: *tracked changes will only show the changes proposed to ordinance since the amendment was submitted for exhibition by the PA to the department. Changes made to ordinance prior to the amendment being submitted for exhibition will not be shown as a tracked change. |
| System Generated | Under Exhibition | DELWP Planner: *tracked changes will show all changes made to ordinance since the amendment was exhibited. For example, will include changes made to ordinance as a result of the PA including recommendation from Panels. *Changes made to ordinance prior to the amendment being under exhibition will not be shown as a tracked change. |
System Generated | Approval Under Consideration | DELWP Planner: *tracked changes will show all changes made to ordinance since the amendment was submitted for approval to the department. For example, will include any that the department has made to the ordinance post adoption by council. *Changes made to ordinance prior to the amendment being submitted for approval will not be shown as a tracked change. |
Amendment document - The file in ATS Authoring that is created after the saving of updates made using the ordinance changes tool from Amendment Tracking. It contains the ordinance that is proposed to be changed. The document includes system notes advising what action is occurring for each ordinance. (Eg. Modify, Delete, Add, etc). Users will edit this document with their proposed changes to the selected ordinance.
Interim Publish - Customised functionality in the Amendment Authoring system (Keystone), when used will generate a PDF of the draft provisions in final form and content, in the context of the whole provision. For example, if the amendment includes the creation of a sub-clause section ‘19.02-1L Infrastructure’, then the entire sub-clause 19.02 and child ordinances will be displayed with the new provision included in the PDF.
Master content – The copy of the ordinance as it exists in the planning scheme.
Snapshot - A copy of the amendment document at a given point in time. A snapshot can be generated;
Page last updated: 13/03/25